Installing a 2din system in a Shogun/Pajero NM – Step By Step guide
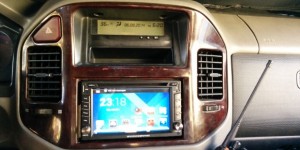
If you ever wondered how to install a double din navigation system in a Pajero, here is the solution 🙂
When I first drove the Pajero I thought, OMG it is HUGE! kids can stand behind it and I won’t even see them.
So, when I bought the first Pajero, I knew I should install a rear camera. That is how it started.
Then, I thought, if I have a camera, why won’t I have a navigation system with it? and if I have a navigation system, why won’t it be free and Android based?
Long story short, I bought a Chinese Android based system, to be honest, it is not the best item I owned, but it works… (I will add a review on it later, stay tuned 🙂 )
Anyway, this guide will show you how to make room for the double din audio system in a Pajero NM (2001-2006, also known as a Mitsubishi Shogun or Montero).
The idea is to move the A/C controls down, instead of the original CD changer/empty cell – depends on your model.
Tools:
1. Philips screwdriver
2. Flat wide screwdriver/ dashboard remover plastic tool (I got mine with my audio system)
In order to install the new audio system you may need a soldering iron and a insulating tape
If your device didn’t arrive with adapters, you may need to create ones, so a 6″x 4″ metal plate (thickness ~1.5mm) and a driller, 4.5″ grinder and a hammer.
It will take you about 2 hours if the wires are all there, it might take you more if you need to add the reverse camera.
Let’s start:
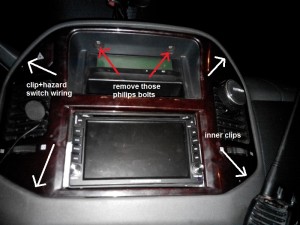
1. Remove the upper 2 Philips bolts and cover the flat screwdriver with a fabric (or use the plastic tool) to remove the plastic cover.
Notice the hazard lights connector that should be disconnected before the cover is being removed completely:
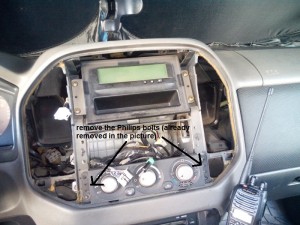
2. Remove the A/C controls unit. Unscrew the Philips bolts around it, notice that there is a hose at the back of it, release it as well (just pull it carefully)
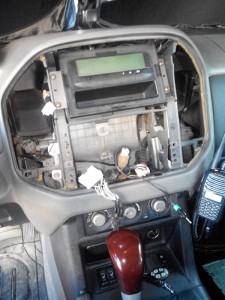
Now, we will work on removing the CD changer, first, we have to move the console.
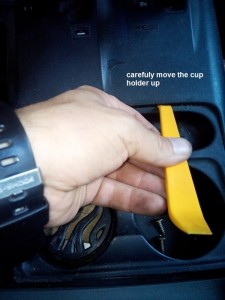
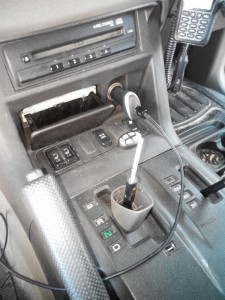
3. Using the flat screwdriver (still with a fabric on it) or the plastic tool (as in the picture below), take the cup holder out:
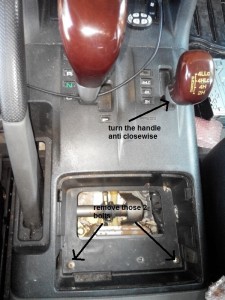
4. Remove the 2 Philips bolts and turn the 4×4 selector anticlockwise till the head of it will be in your hand:
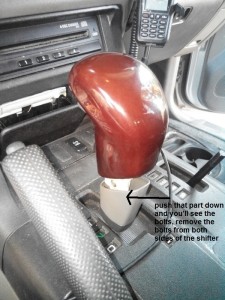
5. Push the lower plastic cover of the gear shifter down, you will hear a “click” and then you will see a small bolt on each side of the shifter. Remove those bolts and keep them in a safe place.
Remove the shifter head.
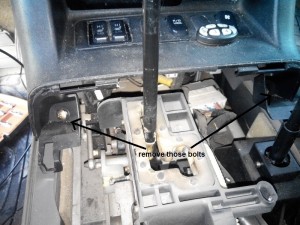
6. Remove the 2 philips bolts and move the console away:
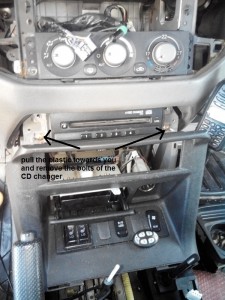
7. Remove the bolts that hold the changer (or your empty cell) in place and pull it carefully. Make sure you didn’t pull any other wiring on the way 🙂
Disconnect the wiring behind the A/C control unit and the hose.
8. Connect the A/C wiring harness and the hose at the back of the A/C controls, this time, move the wiring through the lower place – where it should be install.
Install it in place using the same Philips bolts.
Install the console in reverse order. Notice not to tighten the shifter bolts too much – verify that you can shift gears!
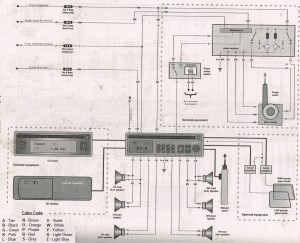
Now, it is the time to setup your wiring harness. if you still have a original connector and an adapter, then, you are lucky. In my case, I had to solder the harness.
Here is the audio system wiring scheme of Pajero NM, it might help you use the original wiring:
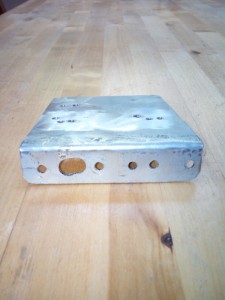
9. It is time to put everything back together. You may need to create an adapter for your system. Mine looked like that:
(Yours might look a little bit different, depends on you mounting points of the device you are installing)
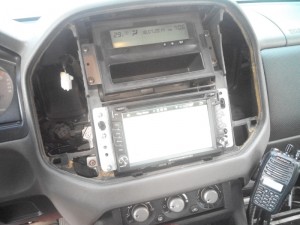
Eventually, it should look something like that:
10. Make sure everything works as it should, the radio stations are being kept in memory, the hazard lights work etc…
and then, install the plastic cover back.
Enjoy…
Related Posts
-
 Does Lucas Power Steering Stop Leak actually work?
No Comments | Dec 9, 2023
 -
 How to replace the rear brakes (and parking brakes) – Pajero/Shogun NM?
10 Comments | Oct 25, 2014
 -
 How to replace a dashboard bulb
29 Comments | Aug 19, 2014
 -
 How to change the Engine Oil – Pajero/Montero NM
4 Comments | Sep 24, 2014
About The Author
saar
My name is Saar. I own a Pajero NM after more than 10 years with a Jeep Cherokee. I would like to document every possible information regarding the Pajero here on our site. Please feel free to contact me to add your stuff here.

Hi Saar,
That’s a nice installation. I was wondering where exactly you mounted the reversing camera, as I’m guessing the location of the spare tire complicates matters somewhat. Also, how did you run the cable from the head unit back to the camera?
Cheers,
Bob
Hi Bob,
Thank you.
I placed the camera on the rear bumper, maybe not the best place thinking of rocks on the way back, but it was good for me and hadn’t broken yet…
I drilled a hole in the bumper, run the wires under the carpet and found a way out of the car near the rear lights.
pictures 1 and two show 2 COMPLETELY differant STEREOS FOR THE PAJERO. why ?
Picture #1 shows the new stereo I installed.
Picture 2 doesn’t show a stereo at all, only the place the factory system was installed (the 1 din).
The idea of the post is to show how to switch from the factory stereo (1 din) to the 2 Din Android system (or any other 2 din stereo)
Thank you for posting this!
I was just looking at upgrading my audio and this is the perfect ‘how to’ for my project!
Going well here!
i decided to order a Mitsubish to DIN loom adapter so am waiting for that to arrive. May I make a couple of observations…?
1) before removing the shift knob put the car into neutral or reverse – it makes it much easier to remove the console. I know your picture shows it but I didn’t do it!
2) There is a cable connector under the console that illuminates the in-gear and 4WD positions – I missed it and was lucky not to break it.
Lastly, may I ask why you didn’t use the bracket off the CD changer? I have my own brackets half made but the changer brackets seem perfect!
Thank you for your observations.
I do not remember any usable CD changer bracket during the installation…
Ihave just done the same on my 2006 pajero gen 3. The old radio had the pinout for sound and power etc. Then another pinout connecting to the pajero info screen above the radio. I was advised to ignore this an just work with the power and speaker wires. The new unit is working fine but I have lost functionality regarding range, km/l and average speed etc. How can I correct this?
Hi,
I have a similar issue. My vehicle doesn’t have average speed, etc. but I have noticed the date is wrong.
Unfortunately, to set the date I have to press the ‘Disp’ button on the radio which I have now removed!
Wondering if it is worth putting the old radio back to set the date or if disconnecting the battery would help.
Hi,
All finished and working perfectly…
In the end I used a camera that replaces one of the number plate lights and took a live feed from the rear wiper motor.
I ran the signal through the rubber tube, up to the roof, across the headlining and down the ‘A’ pillar…
I took the ‘trigger’ for the reversing camera from the large connector just in front of the 4WD lever.
I used the brackets from the 4CD changer to fit the head unit and they are perfect for the job.
For Satnag I downloaded iGO which is excellent.
I have two long black screws leftover!
Bah!
Now I have lost the aircon display – internal/external temperature and fan speed, etc.
Assume the cable has come out of the back of the aircon unit?
Time to take it all apart again… 🙁
Yup,
The two connectors had come out of the back of the climate control unit…
All working now.
Hi Saar,
What is the optimum size of the new device (W X H X D). I’m afraid to buy a new device and stuck for the size.
Regards.
Hi,
2 din is a standard. every 2 din device would fit.
Hi Saar,
My Pajero has the limited edition clock and I can not change the clock while I’m moving (Normal). I have a wire from Pioneer called “Parking Brake” which will disconnect some of the functionality while you moving. I tried to search for the Clock wiring but no hope. Do you have any information for this or something you can help with.
Regards.
Mohammad
Hi Mohammad,
Sorry, but no, I don’t.
HI Saar,
I have a 2001 Di-D Pajero Shogun, and I am having a problem with the LCD screen, where the lines are not showing on the screen, can not read the time or date and the lower lines as well.
now, the radio does not respond at all, I can just turn the radio on and off only, can not toggle between any stations, no functions work at all. I replaced the LCD with a friend’s LCD and everything is working normally.
Any idea how to fix the problem ?
Thanks alot
Muhammad
Hi Saar,
Many thanks for posting this info, I have a Shogun lwb 2003 model in the uk, your info was very useful. I’ve moved the a/c control unit, and looking for a good Android head unit now. Cheers.
Hi, I’ve ordered an Android 5.1 head unit from Amazon, it’s an Eincar make. I’ll solder an ISO connector to its wiring harness and I’ve already fitted an ISO connector to the cars wiring which I did for my current Sony head unit.
Just one query: Where is the best place to put the GPS receiver?
Thanks.
I placed it near the windshield
I was thinking under the dash, if signal was still ok… would be more discrete. I’ll try it and see how it goes.