How to fix the faulty temp gauge on a Pajero/Shogun/Montero NM (2001-1003)
One of the common problems of the Mitsubishi Pajero NM ( (Montero/Shogun 2001-2003) is the “crazy temperature gauge”.
The symptoms are simple, suddenly, with no notice, the temp gauge shows that the engine’s temperature is in the red area, if you’ll stop and check, you will see that the coolant is not boiling and the engine is not really hotter than usual. In that case, you may suspect that you gauge shows the wrong state.
It is very important to verify that the problem that you see is due to the faulty gauge and not a real over heating. You should do that before taking your dashboard apart…
The problem occurs due to a bad resistor soldering, the fix is simple, solder it again…
Now, while you are sure that the faulty gauge is the problem, let’s fix it.
The work with take something like 30-60 minutes.
Required tools:
1. Philips screwdriver
2. Pointy soldering iron
3. Something pointy to hold the resistor in place, I used a toothpick.
The work itself:
1. Turn off the engine, turn off the switch (you may disconnect the battery, but it is not really needed), lower the steering wheel to the minimum location.
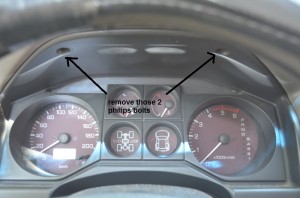
2. Remove those 2 bolts and carefully pull that plastic cover out:
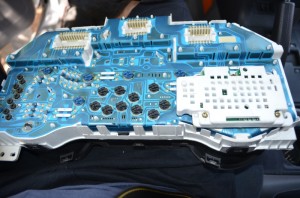
3. Unscrew the following 4 bolts (Philips) , carefully pull the gauges panel towards you, there are 3 connectors on the top of it (at its back) so be careful.
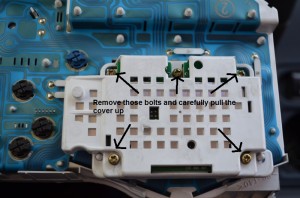
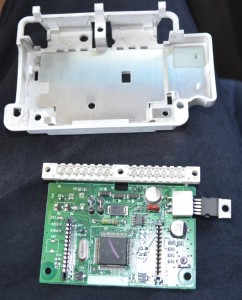
4. You should have the panel in your hands now, look at the 5 bolts on the white plastic cover, remove them and pull the cover carefully.
Be careful, there are pins in the connectors, you don’t want to check their flexibility (hint: there are not flexible at all…)
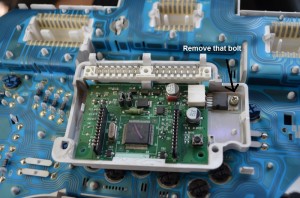
5. Remove that screw, carefully take the board out:
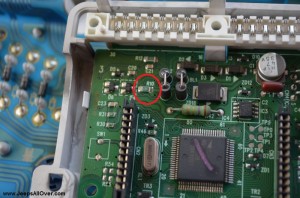
Now, you can see the resistor that cause the issue, it is the R10 one, circled in the picture below:
You may not see that the soldering is broken, I didn’t, till I touched the other soldering with the soldering iron and the resistor fell.
6. Hold the resistor in place with the wooden toothpick (or your other special tool) and solder it to its place – both ends.
Be careful not make the solders too big or “outside the lines” on the board.
7. Put the board and the white cover back in place, screw the bolts of it.
8. Wouldn’t it be nice if all we have to do now is to install everything back in place?
Well, it would. but it won’t 🙂
One of the common problem after that fix is that the speedometer is not working, let’s fix that before the installation.
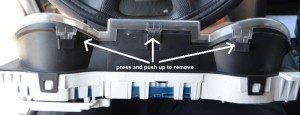
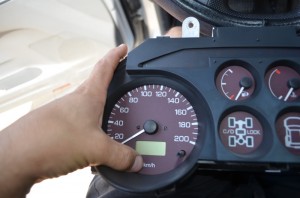
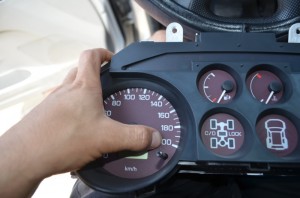
9. Remove the perspex (clear plastic) gauges cover by pressing and pushing on the clips. In the picture below you can see the 3 clips at the bottom, there are 3 more at the top of it:
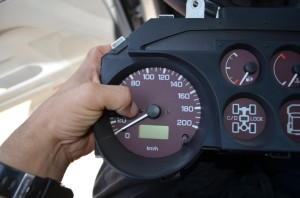
10. Carefully, put the perspex cover somewhere safe and with clean hands, press the plastic gauge near the LCD panel with your thumbs till you’ll hear ~4 clicks
11. Gently, push the pointer up, if it falls down slowly, you are just fine. If it is not, check that you didn’t tighten the bolts too much and check the clicks again.
12. Now it is the time to put everything back together. You may want to replace the bulbs of the dashboard while you are already there…
13. Connect the battery and verify that all of the gauges work.
Good luck 🙂



Thanks for the post. I fixed my 2001 Montero temp gauge today in 20 minutes.
I have to fix my fuel gauge next….
tim
hi Tim,
How did you fix the fuel gauge. I have a problem with it always showing max
I’d also be interested in information relating to the fuel gauge. Mine is quite erratic and tends to go up past where it should be before it settles back down eventually, most of the time.
Hey there I’m having the same problem with my 2000 exceed wondering how you went with your please.
Thanks for the info, speedo repaired. I am now unable to read the LCD display on my Speedometer due to missing digits and also faulty fuel gauge. Do you have any ideas.
Cheers Glen
Hi Glen,
You might want to try the last part again (the clicks near the LCD) you may missed a spot…
Good luck
Hi Saar, Thanks for all the info and pictures you put on, very helpful. I am going to replace all the globes in my NP Pajero dash and want to know if there are any globes under the white box. I dont want to pull it out if I dont noeed to. Thanks Brian.
Hi,
As far as I remember, there are no bulbs under the “white box” (the PCB).
That is for the NM model, I think NP is the same, but not sure.
I followed the instructions and the temp gauge now works fine. Thanks for the info.
where did you find the resistor soldering?
What do you mean?
Thank you so much!!!
Great instructions, my Montero is now back in action
Hi,
Thanks for the brilliant elaboration. I have a somewhat similar if different problem. My fuel gauge goes to max whenever the car is started while the temperature gauge is always showing quarter. My question to you is the resistor mentioned above same for both fuel and temp? If not, which is for fuel ? Thanks in advance
Hi,
I don’t think it is the same resistor, but I don’t know which one it is.
Are you sure that the problem is the gauge? maybe it is somewhere before it?
Yes, we put in instrument cluster panel from another pajero and it was working fine. Can you suggest what I should get checked?
To be honest, I don’t know.
It would be great if you could share the solution here when you’ll find it.
Sorry,
Saar
Ok will do it if i succeed
Hi saar,
Do you know how to fix the problem of gear led not working (the picture of the 4 well gear). In my case only the left working and the differential.
Hi,
If the problem is only the leds which are not working, please refer to:
http://www.pajero.guru/how-to-replace-a-dashboard-bulb/
Otherwise, we will have to figure out the problem…
great pic i just fix a 2003 montero thx a lot keep up the good work. robb
Hi saar i dont get the step 11 which pointer need to press is it the black middle of the pointer?
Hi, In step 10 you press around the needle/pointer. in step 11 you just move the needle/pointer up and see that it goes back down.
You can see the pressing location in the relevant pictures.
Hi guys, I have a 2004 mitsubishi pajero gas and having issues on it. At first driving is smooth, then after how many kilometers, for example there is traffic, I step into brakes, sometimes the engine will turn off when stopping. I replaced the fuel, fuel filter amd even have the relays checked. Need help please. Thanks
You may want to check vacuum hoses.
I HAVE A PROBLEM ABOUT MY PAJERO SPEEDOMETER AND FUEL GAUGE.WHAT TO DO TO FIX IT?
What is the problem? do they work some of the time? don’t they work at all?
Thanks for the tip Saar, you just saved me $450 Aussie dollars. Had the car booked in and luckily did a google search before it went in. Much appreciated. I’m sending you a virtual beer!
Thank you, My pleasure 🙂
My speedo stopped working, I opened panel and in reassembly the trip reset switch got stuck. When I discovered it, I freed it up but gauge never worked again. Any ideas?
Hi,
Which gauge never worked again, the speedo?
Have you checked the speed sensor?
2008 LHD Pajero 2.8 Diesel Africa spec: instrument panel not working although some check lights flash up during start up, and some top row lights flash intermittently. All lights , horn, indicators seem to work. Compass/clock display OK. Checked all fuses. Really grateful for any suggestions. Local dealer unable to help!
Hi saar!
Thanks for your complete guide for fixin temp gauge!
Any chances to see the same guide for fuel gauge or maybe you can point the resister responsible for fuel gauge. I read comments and saw you told it’s not R10.
I owe pajero 3 Did 2001. Already measured voltage of fuel level sensor, it seems it’s working. Fuel gauge needle works irregulary, time to time. Any clues?
Hi,
Sorry, but I don’t know.
Mine worked just fine so I never had to face it.
Wow!! This worked great for me!!! I accidentally soldered off the r46 though. I soldered it back but not sure if i did that one right… My fuel fauge isn’t accurate anymore though because i fielled it up and it’s showing me a fourth tank.. Could that be the one for the fuel gauge?
Thanks!!
Hi
That might be. I never tried that one…
Hi Saar, Thank you so mush for this post. You have saved me so mush time and money. Your fix was spot on every step of the way. Heat gauge problem resolved!!!
Always a pleasure 🙂
R10 is intact whats next to look ?
If the R10 is in place, welded, then look for a real overheating problem.
How do you know it is in place? did you weld it again? (when I did that, it looked just fine, only when we toughed it with the soldering iron, we saw the other side was broken…)
Hi,
I just bought a Pajero nm recently. The speedometer reading is not right. My gps is showing 100km/h but my Pajero speedo is at 120km/h. Do you have any clue what is the problem?
Any chance the tires size is different that the original?
Usually, there is ~5-10% difference between the GPS and the speedometer (in most cars I know)
HI Saar!
Thanks a lot for your tutorial Great job!!!
I think about do that fix but, do your km are reset (on the lcd panel)?
sorry for my english (I’m from france 😉
THANKS!!!
Hi,
No, it should not be reset.
Hi,
just to say I did it and it works perfectly, thanks you so much!!!
My pleasure 🙂
Hi
My quistion is Do I have to change the R10 , or just rewelding it again ?
Usually, re-welding it would do the job.
Excellence step by step instructions. My car was an NP 02, so I was not sure if it was the same as the NM. Resolder and puched in speedo, replaced 2 display globes bow 100 percent. Thanks Richard.
Thank you 🙂
Hi
I have tried registering twice on your site, no luck.. Both times, it says: “check email”
Have never gotten an email:)
I have a question:
My 2003 diesel Montero – full size has a strange transmission problem.
Was working fine, took it to a car wash, washed the engine, problem started.
Shifts fine all thru the gears. Get to 90-100kph and transmission shifts into over drive. Perfectly.
Start to apply the brakes and decelerate, transmission shifts “hard” out over over drive…?
Any thoughts?
Thanks a lot!
Hi,
I will check the registration issue, thank you.
I would start looking for wiring issues – bad connectors, corrosion that might caused by the water/pressure.
I don’t have any specific idea but to start checking them one by one.
I have just fixed both my temperature gauge and my speedo on a 2003 Shogun using this method in about 25 minutes all in with some very careful soldering. . The only thing it doesn’t say is why step 5…… This is because the underside gets hot when you are soldering and the heat shield could spread the heat and damage other stuff. THANKS for saving me a fortune.
Tip! I have done this with great success a year ago. But first time I mounted it I missed the speedo, fulegauge and other Things. If this happens you have broken one of the plastic-pins in the white plastic. The print-card will touch the aluminium plate inside. Take it apart and make sure the print is correct mounted. You might put some electrical tape between
Regards Christian 🙂
Does the resistor problem affect 2004 models, have fitted new w/pump, temperature sensor and thermostat, and still both the fuel gauge and the temp gauge lie , showing 3/4 full, when it’s actually 1/4. Temperature at a quarter after being parked on the drive for 12 hrs at least.
sounds like that.
Saar…. cannot thank you enough …. this was exactly what my problem was ! ! ! ..although I took my 2002 Gen 3 Pajero to an auto-electrician to do the actual job as per your fix , it fixed the problem. Interestingly not one electrician knew about it. You are a legend. The Auto “electricians” don’t like being offered suggestions do they ? They would have had no idea. both Temp gauge and Fuel gauge always crazy – now fixed. Cheers from New Zealand
Thank you for the kind words.
Always a pleasure 🙂
Just to add to feedback (and my previous comment) .. it would seem that the resolder of R10 resistor fixed both my temp AND Fuel gauge which were moving around. Also the pressing of the speedo face is also true as it happened in my case. The electrician had to remove the cluster again and found that the clear cover was pressing on the needle hub making it stick. Once speedo face pressed back properly into place all fine and don’t over tighten the screws. Important…
Works just as described
Hi Saar, just fixed the problem on my 2001 NM Exceed. Thank you so much.
Cheers, Thomas
My questions is….. are you soldering R10 on the side you see the resistor on or the underneath side that you can’t see? Also which side of R10 (left or right) seems to be the the side most of you who fixed it, actually soldered…..or did you just put solder (re-touch) on both sides of R10 ? Also one last question as was asked before but was not answered,….. why is it necessary to remove the circut board if you actually do re-solder the side you can see R10 on ? Please post all answers asap . Several answers from different people would be nice. Would like Saar’s answer too since he is the host and brain for this fix ! Thanks everyone !
how to diagnose to overheating?? when the water was not boiling and the engine is very heat.. the water pump was function..
Thanks for the information was very helpful in just fixed my and it works. Thanks again
I just fixed mine(2004, 3,2 DID), thank you! My lcd display got bad son I took the board, with the R10 off and screwed it back to cluster again. This fixed the lcd, probably the “touch” pins wich were badly connected. Thanks again from NORWAY!
My pleasure 🙂
Hi saar i did fix my faulty temp meter but Now the lcd does not show my kms it only shows scramble Numbers help plZ
you may over tighten the bolts/clicks at the back of the pcb.
Hello Saar, you are live saver for our 258,000 miles 2001 Montero, I followed your instruction and just did it, now no more weird temp gauge reading, not sure what else did I touched, the 2 green wheels lights are on, the right wheel light was off for years.
I believe the Mitsubishi need to make this R10 resistor issue as a manufacture recall or at least educate their dealer’s service advisers and mechanics. Thanks again saar.
I’m from Romania and i buy a pajero 3.2swb from U.K. On the road to house near Belgium after a coffebreak my temp was on red zone. Ufff….with attention, after 2 days, i arrived in Romania. Here, i change thermostat, sennsor temp, water pump and radiator, same problem andstsuspect yhe head-gasket. After i read your post and fix the resistor all my problem with temp is back to nermal.
Thank you very much. Never think at this problem without your post.